Creating NixOS SD Card Installer for Raspberry Pi 5
- Introduction
- Raspberry Pi OS
- Creating an initial installer
- Populating the firmware
- U-Boot
- Linux
- U-Boot environment
Introduction
I’ve been running my home server on an old Raspberry Pi 3 B+ for some time now. Unfortunately, due to its limited RAM size of 1 GiB, I’ve been running into a number of problems that could only be solved by purchasing a more powerful machine.
Since I was already quite familiar with SBCs made by the Raspberry Pi Foundation, I naturally gravitated toward their newest offering: the Raspberry Pi 5 in its 16 GiB RAM variant. I figured upgrading my setup within the same vendor ecosystem would be quite easy.
My current home server runs on NixOS. While the NixOS project provides ready-to-use SD card installer scripts for older Raspberry Pi models, the situation is more complicated for the Raspberry Pi 5.
Furthermore, NixOS doesn’t seem to provide a kernel package for the Raspberry Pi 5, nor does it provide a U-Boot package. For the Raspberry Pi 3, both the kernel and U-Boot were provided out-of-the-box. This means custom packages will have to be defined for the installer to use.
Fortunately, the Raspberry Pi firmware package is common for all Raspberry Pi’s, so at least that is taken care of.
In summary, the following elements will need to be provided:
- Raspberry Pi 5 Linux kernel package
- Raspberry Pi 5 U-Boot package
- Raspberry Pi 5 SD card installer script
Raspberry Pi OS
Let’s start by inspecting the operating system provided by the Raspberry Pi Foundation, namely: Raspberry Pi OS, a Debian-derived Linux distribution. A ready-to-use image can be downloaded directly from the Foundation’s site:
% wget https://downloads.raspberrypi.com/raspios_arm64/images/raspios_arm64-2025-12-04/2025-12-04-raspios-trixie-arm64.img.xz -O raspios.img.xz
% unxz raspios.img.xz
% file raspios.img
raspios.img: DOS/MBR boot sector; partition 1 : ID=0xc, start-CHS (0x80,0,1), end-CHS (0x3ff,3,32), startsector 16384, 1048576 sectors; partition 2 : ID=0x83, start-CHS (0x3ff,3,32), end-CHS (0x3ff,3,32), startsector 1064960, 11534336 sectors
It looks like a standard disk image that we can copy to our target SD card. Let’s do that:
% dd if=raspios.img of=/dev/sdb oflag=sync bs=1M status=progress
Now for the interesting part: let’s check whether it will actually boot. We need to attach a serial console somewhere to the SBC. If this device works like the older Raspberry Pi models, then we can use the UART exposed on the GPIO header.
Let’s connect the FT232 UART adapter like so:
         GND <-> GND
GPIO14 (TxD) <-> FT232 RxD
GPIO15 (RxD) <-> FT232 TxD

Next, we can use picocom to actually interact with our serial console:
% picocom -b 115200 /dev/ttyUSB0
Unfortunately, it’s silent. But that was to be expected, as we still need to
enable the UART console. We can do that by enabling UART in config.txt, and
adjusting command line arguments passed to Linux in cmdline.txt.
Let’s start with config.txt. We need to use the enable_uart option, and
provide a DTB overlay for the bootloader to use:
> enable_uart=1
> dtoverlay=uart0
Then, we need to switch the default console Linux uses to ttyAMA0, which is
the default name for PL011 TTYs:
< console=serial0,115200 console=tty1 root=PARTUUID=efab4ffe-02 rootfstype=ext4 fsck.repair=yes rootwait resize quiet splash plymouth.ignore-serial-consoles
---
> console=ttyAMA0,115200 console=tty1 root=PARTUUID=26187812-02 rootfstype=ext4 fsck.repair=yes rootwait quiet splash plymouth.ignore-serial-consoles
With those changes in place, we can see the output from Linux on the serial
console and verify that we can successfully reach getty:
Debian GNU/Linux 13 raspberrypi ttyAMA0

My IP address is 127.0.1.1 ::ffff:127.0.1.1

raspberrypi login:
With that, we’ve verified that the HW is indeed functional, and we can move to actually creating an installer script using Nix.
Creating an initial installer
Let’s start by creating something basic: a boilerplate, but one that we can
actually build with nix-build.
NixOS provides the sdImage derivation to create SD card images, so we’ll use
that. We also have to set up cross-compilation, since the machine that we’re
building the installer on is amd64, while the Raspberry Pi 5 is aarch64. The
nixpkgs.crossSystem.system option will help us with that.
Finally, NixOS sets the boot.loader.grub.enable option to true by default.
We won’t be using GRUB, so let’s disable it. Our rpi5-installer.nix looks
as follows:
{ lib, config, pkgs, ... }:

{
  nixpkgs.crossSystem.system = "aarch64-linux";
  imports = [
    <nixpkgs/nixos/modules/installer/sd-card/sd-image.nix>
  ];

  boot.loader.grub.enable = false;

  sdImage = {
    compressImage = false;

    populateFirmwareCommands = ''
    '';

    populateRootCommands = ''
    '';
  };
}
The sdImage derivation compresses the image with zstd by default. We don’t
want to deal with decompressing the image after every build, so let’s disable
that as well.
The installer is still missing many required components, like Linux and U-Boot,
and it doesn’t provide the config.txt file required by the bootloader, but
let’s try building it right now anyway:
% nix-build '<nixpkgs/nixos>' -A config.system.build.sdImage -I nixos-config=./rpi5-installer.nix
This will take some time, as we need to cross-compile every package. Finally, we’re informed that the installer image has been created:
firmware_part.img: 1 files, 0/15321 clusters
61440+0 records in
61440+0 records out
31457280 bytes (31 MB, 30 MiB) copied, 0.11289 s, 279 MB/s
/nix/store/bppsx3vxq4bxrf6j997ymbvbqn62br09-nixos-image-sd-card-25.11.4882.fa83fd837f30-aarch64-linux.img-aarch64-unknown-linux-gnu
The SD card image is also available locally at
./result/sd-image/nixos-image-sd-card-25.11.4882.fa83fd837f30-aarch64-linux.img.
Let’s inspect its contents. First, we’l use losetup to set up a loop device,
so that we can actually mount the individual partitions:
% losetup --partscan --find --show ./result/sd-image/nixos-image-sd-card-25.11.4882.fa83fd837f30-aarch64-linux.img
/dev/loop0
Next, let’s check the created block devices:
% ls /dev/loop0*
/dev/loop0  /dev/loop0p1  /dev/loop0p2
Finally, let’s mount and inspect the partitions:
% mkdir -p ./firmware ./rootfs
% mount /dev/loop0p1 ./firmware
% mount /dev/loop0p2 ./rootfs
% ls ./firmware
% ls ./rootfs
lost+found  nix  nix-path-registration
Right now, the firmware partition is empty. This was expected, since we
didn’t provide the populateFirmwareCommands option with any commands. The
rootfs partition, however, is already filled with packages from the Nix store:
ls ./rootfs/nix/store/ | wc -l
567
Let’s unmount the partitions and detach the loop device before proceeding:
% umount ./firmware ./rootfs
% losetup -d /dev/loop0
Populating the firmware
As mentioned in the introduction, the Raspberry Pi Firmware package provides
firmware and device tree binary blobs. As of date, the raspberrypifw package
is in version 1.20250430. Ultimately, the raspberrypifw package fetches the
raspberrypi/firmware repository from GitHub. We can see
that the 1.20250430 tag already contains BCM2712 device tree blobs, meaning -
we can use the package as-is:
populateFirmwareCommands = ''
  pushd ${pkgs.raspberrypifw}/share/raspberrypi/boot
    # firmware blobs
    cp bootcode.bin fixup*.dat start*.dat $NIX_BUILD_TOP/firmware/

    # device tree blobs
    cp bcm2712*.dtb $NIX_BUILD_TOP/firmware/
  popd
'';
Now, let’s inspect the firmware partition again:
% losetup --partscan --find --show ./result/sd-image/nixos-image-sd-card-25.11.4882.fa83fd837f30-aarch64-linux.img
% mount /dev/loop0p1 ./firmware
% ls firmware
bcm2712d0-rpi-5-b.dtb  bcm2712-rpi-cm5-cm4io.dtb   bootcode.bin  fixup4x.dat   fixup_x.dat
bcm2712-d-rpi-5-b.dtb  bcm2712-rpi-cm5-cm5io.dtb   fixup4cd.dat  fixup_cd.dat
bcm2712-rpi-500.dtb    bcm2712-rpi-cm5l-cm4io.dtb  fixup4.dat    fixup.dat
bcm2712-rpi-5-b.dtb    bcm2712-rpi-cm5l-cm5io.dtb  fixup4db.dat  fixup_db.dat
Neat! But there are still two elements missing, namely: config.txt and
cmdline.txt. For config.txt, we’ll have to use the writeText package to
create a text file on the fly:
config = pkgs.writeText "config.txt" ''
  disable_overscan=1
  enable_uart=1
''
Then, we can just copy it in populateFirmwareCommands:
cp ${config} $NIX_BUILD_TOP/firmware/config.txt
At this point, the full rpi5-installer.nix would look as follows:
{ lib, config, pkgs, ... }:

{
  nixpkgs.crossSystem.system = "aarch64-linux";
  imports = [
    <nixpkgs/nixos/modules/installer/sd-card/sd-image.nix>
  ];

  boot.loader.grub.enable = false;

  sdImage = {
    compressImage = false;

    populateFirmwareCommands = let
      config = pkgs.writeText "config.txt" ''
        disable_overscan=1
        enable_uart=1
      '';
    in
      ''
        pushd ${pkgs.raspberrypifw}/share/raspberrypi/boot
          # firmware blobs
          cp bootcode.bin fixup*.dat start*.dat $NIX_BUILD_TOP/firmware/

          # device tree blobs
          cp bcm2712*.dtb $NIX_BUILD_TOP/firmware/
        popd

        # copy config.txt
        cp ${config} $NIX_BUILD_TOP/firmware/config.txt
      '';

    populateRootCommands = ''
    '';
  };
}
Let’s verify that we have indeed populated the partition with config.txt:
% cat ./firmware/config.txt
disable_overscan=1
enable_uart=1
Cool! As for cmdline.txt, we won’t have to provide this file. While for
Raspberry Pi OS the bootloader stored on EEPROM does all the heavy lifting and
boots Linux directly, we’ll rely on U-Boot to do that. Meaning, instead of
having the original flow of:
- Startup code jumping to EEPROM bootloader
- EEPROM bootloader starting Linux
We’ll do:
- Startup code jumping to EEPROM bootloader
- EEPROM bootloader launching U-Boot, with U-Boot acting as a 2nd stage bootloader
- U-Boot starting Linux
U-Boot
To build U-Boot, we can use the buildUBoot package already provided by NixOS.
We’ll rely on a generic ARM64 Raspberry Pi configuration for U-Boot, as it
doesn’t ship with a Raspberry Pi 5 specific configuration file:
ubootRaspberryPi5_64bit = pkgs.buildUBoot {
  defconfig = "rpi_arm64_defconfig";
  extraMeta.platforms = [ "aarch64-linux" ];
  filesToInstall = [ "u-boot.bin" ];
};
Next, we need to copy the output binary specified by the filesToInstall
option. The copying command will be part of the populateFirmwareCommands
option of the sdImage derivation:
cp ${ubootRaspberryPi5_64bit}/u-boot.bin firmware/u-boot-rpi5.bin
Finally, we’ll have to instruct the EEPROM bootloader to launch U-Boot and load
a device tree blob. We’ll do that by defining the kernel and device_tree
options to the config.txt file:
kernel=u-boot-rpi5.bin
device_tree=bcm2712-rpi-5-b.dtb
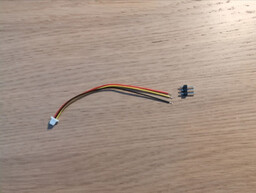
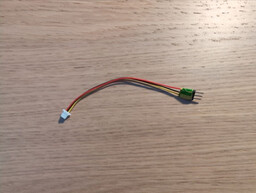
Unfortunately, on Raspberry Pi 5, the UART exposed on the GPIO header is controller by the RP1 chip, which means we’d have PCIe up and running to see any output. PCIe won’t be available to us so early on the boot process, so we’ll have to switch to using the debug UART with the 3-pin JST-SH 1.0mm connector. First, let’s solder the JST-SH male connector to a 2.54 mm goldpin male connector:
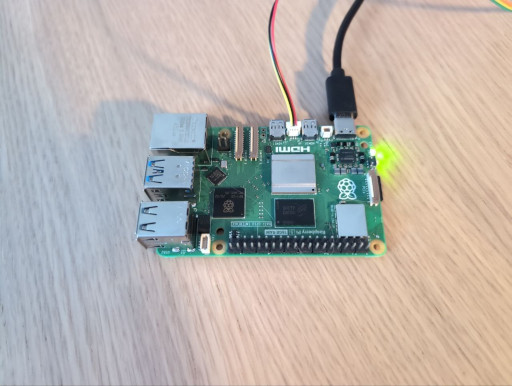
Next, we can connect it to the debug UART female connector. The debug UART is located between the two micro-HDMI connected to Raspberry Pi 5:
Let’s build the SD card image, flash it and see if U-Boot works:
U-Boot 2025.10 (Oct 06 2025 - 19:13:09 +0000)

DRAM:  1020 MiB (total 16 GiB)
RPI 5 Model B (0xe04171)
Core:  25 devices, 11 uclasses, devicetree: board
MMC:   mmc@fff000: 0, mmc@1100000: 1
Loading Environment from FAT... Unable to read "uboot.env" from mmc0:1...
In:    serial,usbkbd
Out:   serial,vidconsole
Err:   serial,vidconsole
Net:   No ethernet found.

starting USB...
No USB controllers found
       scanning usb for storage devices... 0 Storage Device(s) found
Hit any key to stop autoboot:  0
U-Boot>
U-Boot> echo "Hello world!"
Hello world!
Seems to be working just fine! The rpi5-installer.nix at this step looks as
follows:
{ lib, config, pkgs, ... }:

let
  ubootRaspberryPi5_64bit = pkgs.buildUBoot {
    defconfig = "rpi_arm64_defconfig";
    extraMeta.platforms = [ "aarch64-linux" ];
    filesToInstall = [ "u-boot.bin" ];
  };
in
{
  nixpkgs.crossSystem.system = "aarch64-linux";
  imports = [
    <nixpkgs/nixos/modules/installer/sd-card/sd-image.nix>
  ];

  boot.loader.grub.enable = false;

  sdImage = {
    compressImage = false;

    populateFirmwareCommands = let
      config = pkgs.writeText "config.txt" ''
        disable_overscan=1
        enable_uart=1
        kernel=u-boot-rpi5.bin
        device_tree=bcm2712-rpi-5-b.dtb
      '';
    in
      ''
        pushd ${pkgs.raspberrypifw}/share/raspberrypi/boot
          # firmware blobs
          cp bootcode.bin fixup*.dat start*.dat $NIX_BUILD_TOP/firmware/

          # device tree blobs
          cp bcm2712*.dtb $NIX_BUILD_TOP/firmware/
        popd

        # copy config.txt
        cp ${config} $NIX_BUILD_TOP/firmware/config.txt

        # copy uboot
        cp ${ubootRaspberryPi5_64bit}/u-boot.bin firmware/u-boot-rpi5.bin
      '';

    populateRootCommands = ''
    '';
  };
}
With that done, we can move forward to booting Linux.
Linux
Unlike U-Boot, there is some support for the Linux kernel for Raspberry Pi 5,
just not in the main nixpkgs repository. Raspberry Pi 5 profile is hosted by
the NixOS Hardware project. While it doesn’t provide a U-Boot
package, it does provide a kernel for us to use.
Let’s start by adding the NixOS Hardware channel:
% nix-channel --add https://github.com/NixOS/nixos-hardware/archive/master.tar.gz nixos-hardware
% nix-channel --update
Next, we can add Raspberry Pi 5 profile to the import list:
imports = [
  <nixpkgs/nixos/modules/installer/sd-card/sd-image.nix>
  <nixos-hardware/raspberry-pi/5>
];
If we tried to build the image right now, we’d get the following initramfs error:
modprobe: FATAL: Module dw-hdmi not found in directory /nix/store/hrmcrm11myqzr7k0gxlhcy8fv7g01d2b-linux-rpi-aarch64-unknown-linux-gnu-6.12.47-stable_20250916-modules/lib/modules/6.12.47
Since dw-hdmi is not something we need to get Linux booting, we can use the
boot.initrd.allowMissingModules to create a quick workaround for this:
boot.initrd.allowMissingModules = true;
We’re also going to enable extlinux to serve as a boot configuration menu, so
that we can choose between NixOS generations:
boot.loader.generic-extlinux-compatible.enable = true;
Finally, we can populate rootfs (the /boot directory specifically) using an
extlinux-compatible populate command:
populateRootCommands = ''
  mkdir -p ./files/boot
  ${config.boot.loader.generic-extlinux-compatible.populateCmd} -c ${config.system.build.toplevel} -d ./files/boot
'';
After rebuilding and reflashing the SD card, we can give booting Linux a go.
Let’s boot into U-Boot and use the boot command:
U-Boot> boot
Cannot persist EFI variables without system partition
** Booting bootflow '<NULL>' with efi_mgr
Loading Boot0000 'mmc 0' failed
EFI boot manager: Cannot load any image
Boot failed (err=-14)
** Booting bootflow 'mmc@fff000.bootdev.part_2' with extlinux
------------------------------------------------------------
1:	NixOS - Default
Enter choice: 1:	NixOS - Default
Retrieving file: /boot/extlinux/../nixos/wfimd7gj9w3qkmx7win4572879qls3nf-linux-rpi-aarch64-unknown-linux-gnu-6.12.47-stable_20250916-Image
Retrieving file: /boot/extlinux/../nixos/88czmr4ly0ylyfz3rsz8irinc0c4djgm-initrd-linux-rpi-aarch64-unknown-linux-gnu-6.12.47-stable_20250916-initrd
append: init=/nix/store/rrnlsai61wslk3d7j0dhds1w29zx3qms-nixos-system-nixos-sd-card-25.11.5198.e576e3c9cf9b/init loglevel=4 lsm=landlock,yama,bpf
Retrieving file: /boot/extlinux/../nixos/wfimd7gj9w3qkmx7win4572879qls3nf-linux-rpi-aarch64-unknown-linux-gnu-6.12.47-stable_20250916-dtbs/broadcom/bcm2712-rpi-5-b.dtb
Moving Image from 0x80000 to 0x200000, end=0x22b0000
## Flattened Device Tree blob at 05600000
   Booting using the fdt blob at 0x5600000
Working FDT set to 5600000
   Loading Ramdisk to 1f475000, end 1ffff024 ... OK
   Loading Device Tree to 000000001f45e000, end 000000001f4743ac ... OK
Working FDT set to 1f45e000
At first, it correctly identifies and loads the kernel image and devicetree blob. Then, unfortunately, it crashes during early stages of Linux initialization:
[ 0.240337] SError Interrupt on CPU3, code 0x00000000be000011 -- SError
U-Boot environment
After some research, it turned out that I have the 1.1 revision of the Raspberry
Pi 5 board, which has the BCM2712D0 (D stepping) System-on-Chip, which the
bcm2712-rpi-5-b.dtb device tree blob is incompatible with. Fortunately,
there’s a bcm2712d0-rpi-5-b.dtb available for us to use
We can verify that Linux will boot correctly if we set the fdtfile environment
variable in U-Boot to bcm2712d0-rpi-5-b.dtb. First, let’s inspect the
environemnt ourselves:
U-Boot> printenv
[...]
fdtfile=broadcom/bcm2712-rpi-5-b.dtb
Then, let’s set it to our target:
U-Boot> setenv fdtfile broadcom/bcm2712d0-rpi-5-b.dtb
U-Boot>
Finally, let’s try booting Linux again:
U-Boot> boot
And it boots! We finally get to getty:
<<< Welcome to NixOS sd-card-25.11.5198.e576e3c9cf9b (aarch64) - ttyAMA10 >>>

Run 'nixos-help' for the NixOS manual.

nixos login:
To automate this process, we can create an U-Boot environment, and install it
during the populateFirmwareCommands step. Unfortunately, we need to provide
the full environment, i.e. we can’t just change one variable. Let’s dump it with
printenv and put it into a text file using writeText again:
ubootEnv = pkgs.writeText "uboot.env.txt" ''
  arch=arm
  baudrate=115200
  board=rpi
  board_name=5 Model B
  board_rev=0x17
  board_rev_scheme=1
  board_revision=0xE04171
  boot_targets=mmc usb pxe dhcp
  bootcmd=bootflow scan
  bootdelay=2
  bootm_size=0x20000000
  cpu=armv8
  dhcpuboot=usb start; dhcp u-boot.uimg; bootm
  ethaddr=88:a2:9e:87:9d:8b
  fdt_addr=2efec800
  fdt_addr_r=0x05600000
  fdtcontroladdr=3f730590
  fdtfile=broadcom/bcm2712d0-rpi-5-b.dtb
  kernel_addr_r=0x00080000
  kernel_comp_addr_r=0x02000000
  kernel_comp_size=0x03400000
  loadaddr=0x1000000
  preboot=pci enum; usb start;
  pxefile_addr_r=0x05500000
  ramdisk_addr_r=0x05700000
  scriptaddr=0x05400000
  serial#=f849b6d5b36eabd9
  soc=bcm283x
  stderr=serial,vidconsole
  stdin=serial,usbkbd
  stdout=serial,vidconsole
  usb_ignorelist=0x1050:*,
  usbethaddr=88:a2:9e:87:9d:8b
  vendor=raspberrypi
'';
Now, let’s use mkenvimage command to create an environment image that
U-Boot can read. Note that we’ll have to be careful here to use mkenvimage
from the host machine architecture, i.e. the machine that we’re building the
installer on, and not the target machine one. We can do that by referencing
pkgs.buildPackages:
${pkgs.buildPackages.ubootTools}/bin/mkenvimage -s 16384 -o $NIX_BUILD_TOP/firmware/uboot.env ${ubootEnv}
With that done, we check if our environment is being used by U-Boot and whether we can boot:
Loading Environment from FAT... OK
[...]

<<< Welcome to NixOS sd-card-25.11.5198.e576e3c9cf9b (aarch64) - ttyAMA10 >>>

Run 'nixos-help' for the NixOS manual.

nixos login:
Success! The final rpi5-installer.nix file is available
here.